|
|
|
|
|
|
Not a member? Join Today to see why so many say they are Proud to be a Venturer!
|
|
| Shock Linkage Modification |
|
Author: Richard Butler Views: 12093 Votes: 10 |
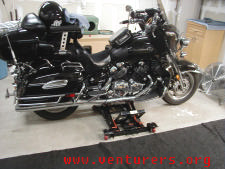
Shock Linkage to Raise the Rear of a RS VentureThe Venture because of it’s cruiser style is a bit lower in the rear and gives your more rake & trail, which makes for a slower handling bike both at slow speed turns and high speed curves. All I wanted to do was to level the bike up to improve the overall handling. When I learned that Barons offered a lowering kit, which consisted of a set of longer links, I decided that I could then raise the bike by making shorter links. In experimenting with the amount of decrease to get the bike level and raise it 1”, I found that a decrease of ¼” would accomplish that amount of height. The material I used was a length ¼” thick of 1 ¼” wide steel strap I purchased at Lowes, which Home Depot also carries. To start the process, you have to remove the 2 linkage straps from the mono-shock assembly. This is easily done but you really need to have a bike lift to raise the bike to take the pressure off the shock bolts in disassembly and re-assembly.
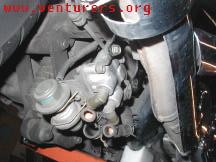
You have to first remove the EIS Reed Valve on the right lower side of the engine. This requires the removal of 4 hoses connected to the unit and 2 -10mm bolts and the units is out of the way.
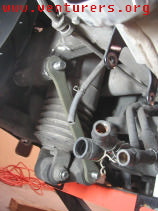
Once this unit is out of the way, you can easily get to both the upper and lower 17mm nuts from the shock linkage bolts. From here you can really remove the top and lower link bolts and then the link arms, but this is really a good time to remove all of the components of the shock linkage and clean and grease all of the needle bearings, inner races and bolts.
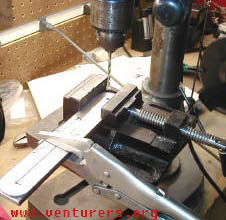
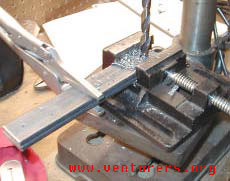
Building a new set of linksCut 2 sections of the ¼” X 1 ¼” steel strap to 7 and 7/8” in length. I made a template to drill small pilot holes (on 6 5/8” center), but you can really measure and score starter punch marks with a prick punch. The smaller holes make centering the holes easier. A drill press with vice is very important in completing the drilling.
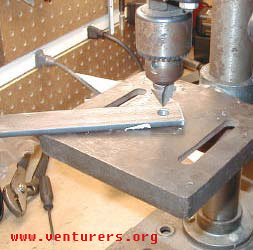
Once you get both pilot holes drilled in one piece of strap, you can now set up to drill the final holes with a 15/32 or 12mm drill bit. It is important that you drill both pieces of strap at the same time to insure correct bolt hole center. You can hold the straps together with the use of a set of straight jawed vice grips.
When you get one set of holes drilled in one end; you can just turn the clamped straps around and drill the second set of holes. To insure perfect bolt hole center for the 2 pieces, drop one of the shock bolts in the 1st set of holes. Once all holes are drilled, you need to chamfer the hole edges on all sides.
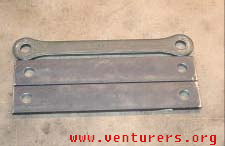
Now you are almost finished, where you only need to round the corners to your satisfaction. Now as far as plating these new links, I would suggest zinc or hard chrome (not the shiny stuff). However, if you can find a machinist to make these out of stainless strap of the same dimensions, this will solve the problem of having to plate them. This shows the difference between the stock link and the new ones.
Now that you have greased all the needle bearings, races and bolts, you are now ready for re-assembly and don’t forget the correct torque of each nut. 43 ft lbs. for the top shock bolt and 36 ft lbs. for the remaining nuts of the assembly. Final Note:Now take the bike out first for some slow speed maneuvers like doing a figure 8 or just any U turn, where you should see an improvement over the original set up. Then try some 30-mph curves or even a right turn onto another street or road to see how the bike now handles better. Another modification to the RSV to make it handle better in the curves is to change out the front tire from a 150/80-16 to a 130/90 16. I know, it seems this tire would be too narrow for the rim, but it is really a better fit than the standard tire and rides just as good or better. I have always felt the 150 was too large and allowed the bike to wallow in a curve. But being a cruiser it looked good?
Last update: 05:33 AM Friday, January 14, 2005 |
| Related Articles: |
| All material on webpages under the domain venturers.org, is the property of The Venturers, Inc. These materials are protected by copyright and other intellectual property laws. You may not reproduce or retransmit the materials, in whole or in part, in any manner, without the prior written consent of The Venturers, Inc. The free information contained herein is offered in the spirit of helping others and any action or advice taken from these pages is the sole responsibility of the receiver. |