|
|
|
|
|
|
Not a member? Join Today to see why so many say they are Proud to be a Venturer!
|
|
| Fuel Filter Installation in an Accessible Place |
|
Author: Kenneth Thompson (Pudge) Views: 10500 Votes: 5 |
|
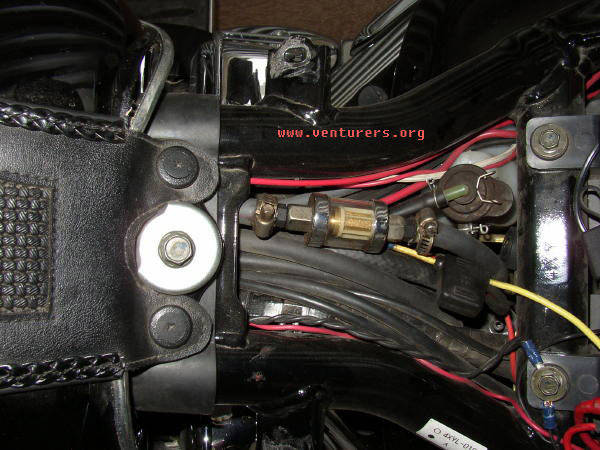
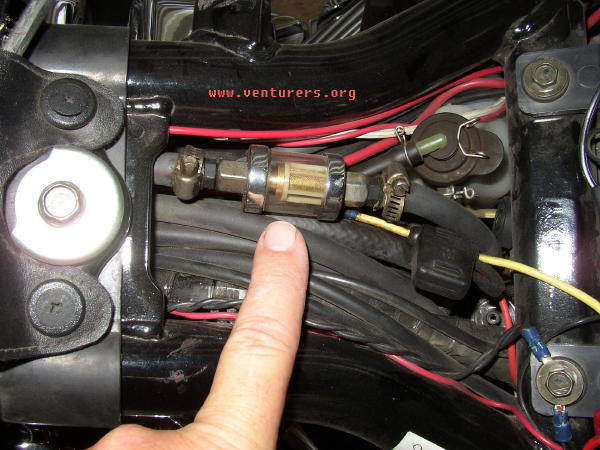
Fuel Filter Installation in an Accessible Place The fuel filter on the second generation RSV is located in an area that is pretty difficult to access. It would certainly be difficult to get to in a hurry if you happened to be on the side of the road and needed to change it or try to blow it out to clean it. Because of this, I decided to install a filter in an easily accessible place upstream from the OEM filter. After some searching, I discovered a good quality filter made by Russell and carried by J & P Cycles [ www.jpcycles.com ] (800-397-4844). They call it a "Universal Fuel Filter". Now you have a fuel filter that you can easily see and determine its condition. I still have my OEM filter in place. It's my feeling that it will last much longer than normal with this filter in place upstream from it. However, if I am ever required to expose the OEM filter for some reason, I expect to remove it and splice the fuel line together in that location, and then use only this filter underneath the seat to filter my fuel. I feel much more comfortable now that I can easily access the filter under the seat. In In the first picture below, you see the filter installed in its suggested location. In the second picture, I am pointing to the filter element contained inside the housing. As you can see, it's easy to tell the condition of the element any time you feel the need. This is a modification that anyone can perform easily for not much money. I believe it could save some grief alongside the road, and possibly even avoid the dreaded tow truck
Forum Comments:
— I know you say it works well for you... but.. I am wondering if pulling the fuel through two instead of one filter media could be causing the fuel pump to work overtime.. and hence lead to an early pump failure?? Especially if the OEM filter had significant mileage and was already somewhat restricted by build up... Author: Pudge, Location: NM, Tatum — You may have a point. I have been too lazy to remove the OEM filter to this point. Good intentions haven't resulted in any action!! I think it would probably be best to remove the OEM filter. It's a fact that a single dirty filter can increase the load on the fuel pump. And two dirty ones would multiply that. I can also say that I've had absolutely no negative issues since I've added the filter under the seat, and it's been in place for well over a year now. And if water in the fuel were to be an issue, I'd think it could possibly get into both filters, and compound the issue along side the road. I regularly use SeaFoam in my fuel tank, and I'd guess that helps a bit with keeping the filter(s) clean as well as the water issue. But I've felt all along that it would be better to only have the one, and you've strenthened my resolve to remove the OEM one, but not until the good riding weather is gone!! Author: Aussie_Dave, Location: ACT, Australia — Thanks Pudge. There has been plenty of talk about this topic and I am glad you put it in one package. I will now have to locate the OEM filter and change over to this set up. Author: Venturous, Location: WV, Eastern — This article should help with the locating the OEM filter: http://www.venturers.org/Tech_Library/index.php?action=article&cat_id=002010&id=275 |
| All material on webpages under the domain venturers.org, is the property of The Venturers, Inc. These materials are protected by copyright and other intellectual property laws. You may not reproduce or retransmit the materials, in whole or in part, in any manner, without the prior written consent of The Venturers, Inc. The free information contained herein is offered in the spirit of helping others and any action or advice taken from these pages is the sole responsibility of the receiver. |