|
|
|
|
|
|
Not a member? Join Today to see why so many say they are Proud to be a Venturer!
|
|
| Installing an LED Passing Light Indicator |
|
Author: Lfoler Views: 10347 Votes: 9 |
|
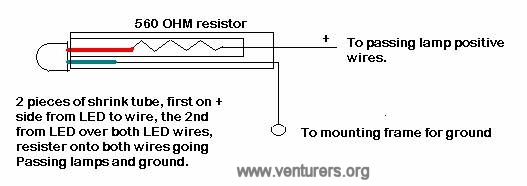
Since I do not like to run my passing lights in the day, I have installed an single 5mm LED (not a multiple LED array) in my dashboard to indicate if my passing lamps are on. The OEM pushbutton switch cannot be seen quickly while riding, and it does not indicate on/off by itself so I did this very simple mod. LED Panel Mount (matches LED spec’s) 560 ohm ¼ watt resistor For LED’s with different spec’s you will need to change this value. Here is a link to a site that will calculate the proper resistor value for a given LED’s spec’s: http://ourworld.compuserve.com/homepages/Bill_Bowden/led.htm The schematic is simple:
The Longer wire of the LED is attached to one end of the resistor. The other end of the resitor is attached to the + side of the Passing Lamps (2x red wires). The short LED wire gets the ground wire that will be connected to the frame for mounting the Cassette player. There is already a factory ground there. I recommend you use shrink tube to cover the + wire from the LED past the resitor and onto the Wire that will go to the Passing Lamp +. Then use a long piece of shrink tube (10”) or so to to cover both + & - wires, resistor, and LED wires all the way up to the LED.
After the windshield and cowling are removed, I removed the Left Speaker (while sitting on the saddle) so I could drill the whole (specified by the LED Panel Mount spec’s) in the dash between the Speaker and Speedometer. You must drill through 2 plastic layers if mounting as I did. *******BE very careful and hold the drill steady and straight. It seems that the plastic is real soft and the drill can drift easily making a larger hole then needed. ****** I used a bit of Rubber cement (clear silicon will be just as good) around the panel mount to make sure there was a watertight seal. Make sure your radio and light and everything else works before you put the cowling back on. That’s it.
Last update: 09:50 PM Monday, March 12, 2007 |
| All material on webpages under the domain venturers.org, is the property of The Venturers, Inc. These materials are protected by copyright and other intellectual property laws. You may not reproduce or retransmit the materials, in whole or in part, in any manner, without the prior written consent of The Venturers, Inc. The free information contained herein is offered in the spirit of helping others and any action or advice taken from these pages is the sole responsibility of the receiver. |