 |
|
|
|
|
|
Not a member? Join Today to see why so many say they are Proud to be a Venturer!
|
|
| Bleeding Your Brake Lines |
|
Author: Archives Views: 17580 Votes: 8 |
Bleeding Your Brake LinesRegular maintenance of your Royal Star Venture includes replacing the brake fluid. Below are 2 methods for performing this "bleeding" operation. The first is the more conventional method while the second involves the use of a vacuum tool. Before you start, make sure you have a new container of DOT4 brake fluid. WARNING - Brake fluid eats paint and must not come into contact with any part of your bike. You cannot clean it off fast enough to prevent damage. Protect your paint finishes with a damp cloth wherever there is a risk of spilling brake fluid onto it. Before beginning, make sure the bike is secure and rotate the handle bars so the fluid reservoir is as near to horizontal as possible. Cover anything that could get brake fluid spilled on it. Remove the rubber caps from the bleeder valves and clean the valves. Note, while these procedures describe bleeding the front brakes, they also apply to the rear brake. Method OneNote: If you release the brake lever while the bleeder valve is open, or if you allow the reservoir to empty, you will introduce air into the system. This is not a good situation and you will have to repeat the procedure until all the air is gone. Method Two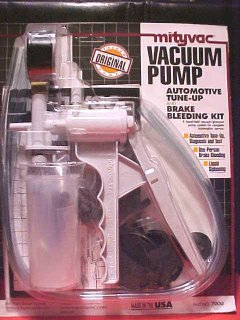 Using a tool called Mighty-Vac makes brake bleeding simple and clean. Mighty-Vac is a small vacuum pump that pulls the brake fluid through the brake line from the bleeder valve on the caliper and collects the excess fluid in a cup built into the tool. It comes with adapters and hoses included. Using a tool called Mighty-Vac makes brake bleeding simple and clean. Mighty-Vac is a small vacuum pump that pulls the brake fluid through the brake line from the bleeder valve on the caliper and collects the excess fluid in a cup built into the tool. It comes with adapters and hoses included.
Before you ride the bike, you must pump the lever and pedal to confirm that they are solid and not spongy. Brake fluid absorbs moisture. This lowers the boiling point so that when the system is hot, gas forms in the lines. This will cause increased wear as the pistons can not release properly when gas or bubbles don't flow back into the fluid sump. Cool brake fluid may show no signs of contamination, but that does not mean that moisture has not entered the system. The most important thing is to make sure you use the required DOT4 brake fluid. Mixing different brake fluids will destroy the seals and o-rings leading to a complete rebuild of the system.
Last update: 04:30 PM Sunday, September 26, 2004 |
| Related Articles: |
| All material on webpages under the domain venturers.org, is the property of The Venturers, Inc. These materials are protected by copyright and other intellectual property laws. You may not reproduce or retransmit the materials, in whole or in part, in any manner, without the prior written consent of The Venturers, Inc. The free information contained herein is offered in the spirit of helping others and any action or advice taken from these pages is the sole responsibility of the receiver. |