|
As you know, the tabs on the back of the plastic chrome windshield trim break very easily. Most of us have broken at least one of them. Following is a relatively easy way to repair these broken tabs so they will be much stronger than the originals. I fixed the ones I had broken, and then decided to make the repair to all the rest of the small tabs. I have not messed with the large tab at the bottom center of the trim piece.
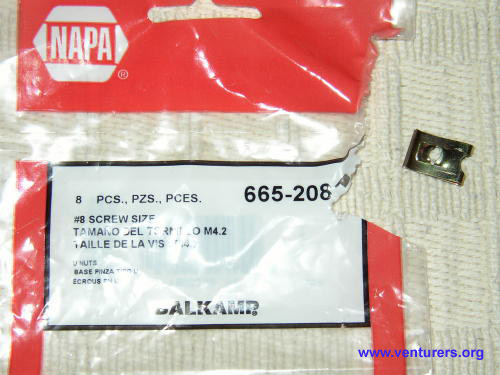
At most auto parts stores, you can find some metal clips that are intended to slide over a piece of plastic (or thin metal) and provide a means of attaching something to it with a screw. I think Auto Zone may call them “speed nuts”. I got mine at Napa and they are identified as “U Nuts, part number 665-208, to fit #8 screw size. Eight to the package for about 5 bucks and change, they ain’t exactly cheap! They come in different sizes, and you will need the smallest ones you can get to do this job. The first picture is of one as it comes from the package, with the package.
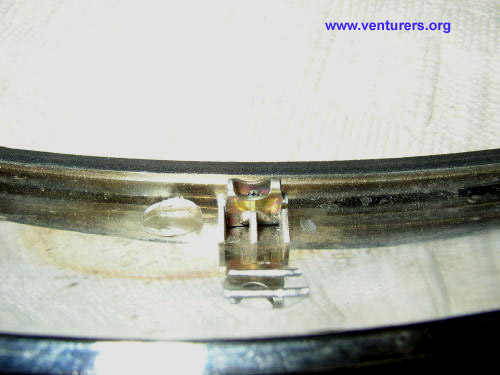
Next picture shows a location of one of the trim tabs. I apologize for not taking a picture of the “before” view with the tab broken off. You can see that there is a center support bar or ridge that is supposed to help keep these tabs from breaking off. In order to slide the clip over the broken support base, you will need to cut the center out of one side of the clip. (See my second post for more pictures of the modified clip.) In addition, because the clip will likely be too wide to slip down inside the outside edges of the base, you will need to shave a bit off each side of the clip. I used my bench grinder to shave the outside edges of the clip, but you could use a sanding drum or the cutting disc on your dremel tool to do the job.
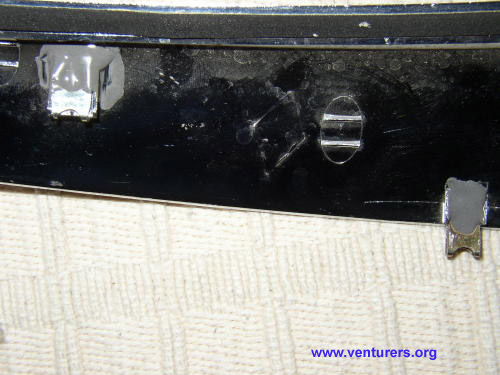
You will need some thin cutting discs and a dremel tool to cut the slot out of the center of one side of the clip to allow it to slip into place. (Go slow with your trimming and grinding to keep the temperature of the clip from getting hot enough to remove the temper from the metal.) Also the length of the clip, when installed, should be no longer than the original plastic tab, and of course, no wider either. You can test the clip’s fit for width by slipping it down inside one of the tab receptacles along the fairing. You will also likely have to shorten one or both open ends of the clip to shorten the overall length so it will fit properly. Here is a picture showing a clip in place on the trim piece, with the center ridge showing that makes us cut a slot in one side of the clip. See picture #2.
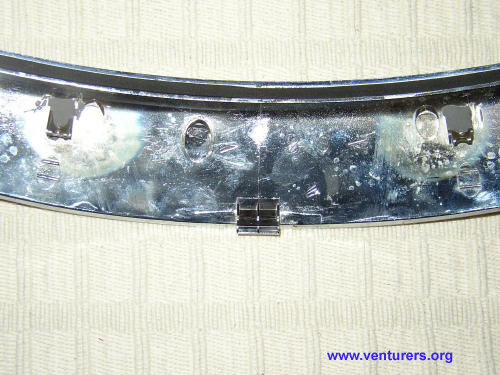
Once you get all your clips trimmed to size, you can slip them into place. I was able to install the trim piece with the clips installed but without epoxy to make sure everything fits well. When it does, mix up some JB Weld and put a small drop of it in the cavity at the rear of the tab bases and make sure it contacts both the metal clip and the plastic under and around it, without increasing the size of the tab where it will be fitting into the fairing slots. Since the clips should fit pretty tightly because of their spring pressure (unless you have taken all the temper out of the metal with your grinding!), it won’t take a lot of glue to anchor the clip. The third picture shows the clips in place on the trim ring.
A word of caution: These clips are small and hard to hold while grinding and trimming. If you have much pressure on them as they heat up while doing this, they will deform. It’s also possible to burn or grind or trim your finger!! Use proper eye protection, and figure out a way to securely hold the clip while you are reshaping it. One possibility is a small pair of needle nosed vise grip pliers to hold the clip, with the pliers held in your vise to free up both hands for dremel tool use. You must be very careful and pay close attention to what you are doing to avoid trouble while reshaping the clips. If you rush or get things in a bind, the thin dremel cutting discs will break and pieces will fly. USE EYE PROTECTION, PLEASE!!!!!
Once in place and epoxied, allow the glue to dry overnight before installation in the fairing (unless you want the trim piece to be permanently installed!!). I feel funny making these last statements, since I know that none of you need these words of caution. But you just never know where these words will end up, or who may be trying to follow these instructions. As always, each of us is totally responsible for our own actions and the consequences of them. If you have questions for me after reading this, ask away, and I’ll try to answer. Good luck with your repairs! See another post for more pictures.
The next two photos show an original clip and a modified clip, front view and back view. This will give you an idea of the modifications you must make so the clips will fit into place on the trim piece. If you have an original tab or two left in place, you can take measurements for length from them. The tabs along the upper inside edge of the trim piece are shorter than those along the bottom edge.


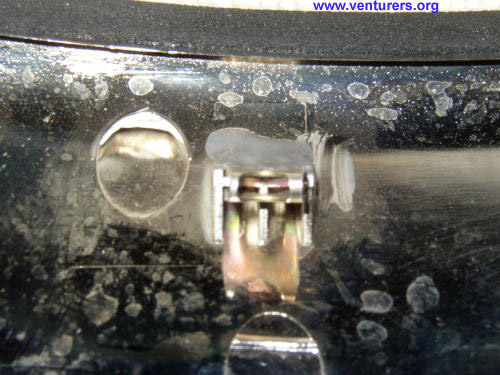
The last two pictures are a couple more showing where I have glued the metal clips in place. Where my tabs were not broken, I just slipped a metal clip over the complete tab and glued it in place. I think you can see, if you look closely, one broken tab repaired and one that was not broken but "fixed" anyway.
Last update: 06:49 PM Saturday, February 4, 2006
|
