Installing Wolo Air HornsBy Jim Sloot (MM1006)
Horns are a crucial safety item. It's generally agreed that the stock horns on the new generation Venture are totally inadequate. I myself have been riding down the highway and could barely hear them, so how could someone in a car with the windows closed possibly hear them? Although they could probably be replaced with after-market electric horns that are louder, I chose to install air horns.
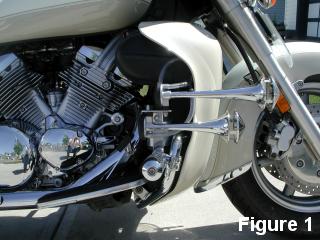 The horns I used are the Wolo Air Splitters. There are 2 trumpets, a compressor and some air tubing. I looked all over the bike for a suitable mounting point, including under the saddle bags, as some others have done previously. You must not only mount the trumpets, but the compressor as well. It has the constraints of requiring some protection from the elements and it must be mounted vertically, with the air outlet on top. Finally, I found the ideal location - I could put everything together to keep the tubing short, as well as give the compressor some protection from direct contact with the elements. However, I did have to fabricate a small adapter bracket to make everything fit togeter. Both trumpets and the compressor are bolted to the adapter, which in turn, is bolted to the front engine guard via the Kuryakin foot peg mounting clamp. Figure 1 shows a side view of the horns mounted to the adapter bracket. The horns I used are the Wolo Air Splitters. There are 2 trumpets, a compressor and some air tubing. I looked all over the bike for a suitable mounting point, including under the saddle bags, as some others have done previously. You must not only mount the trumpets, but the compressor as well. It has the constraints of requiring some protection from the elements and it must be mounted vertically, with the air outlet on top. Finally, I found the ideal location - I could put everything together to keep the tubing short, as well as give the compressor some protection from direct contact with the elements. However, I did have to fabricate a small adapter bracket to make everything fit togeter. Both trumpets and the compressor are bolted to the adapter, which in turn, is bolted to the front engine guard via the Kuryakin foot peg mounting clamp. Figure 1 shows a side view of the horns mounted to the adapter bracket.
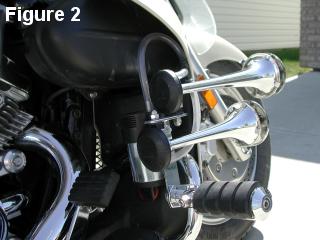 Figure 2 shows the location of the compressor. I made sure that there was absolutely no interference with the operation of the rear brake pedal. To assist in wiring, the horn kit also comes with a relay. I disconnected both stock horns, (in fact, I removed the front one). The wires from the front horn were extended to the relay and connected to each side of the coil windings. A fused power feed was connected to one of the relay switch contacts, while the other switch contact was wired to the positive terminal of the compressor. The negative compressor terminal was wired to ground. The relay is mounted inside the front cowling. This wiring method allows me to use the original handlebar horn switch. Figure 2 shows the location of the compressor. I made sure that there was absolutely no interference with the operation of the rear brake pedal. To assist in wiring, the horn kit also comes with a relay. I disconnected both stock horns, (in fact, I removed the front one). The wires from the front horn were extended to the relay and connected to each side of the coil windings. A fused power feed was connected to one of the relay switch contacts, while the other switch contact was wired to the positive terminal of the compressor. The negative compressor terminal was wired to ground. The relay is mounted inside the front cowling. This wiring method allows me to use the original handlebar horn switch.
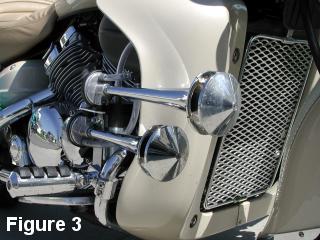 A couple of points to keep in mind when mounting the trumpets. They should have the covers installed and they should point slightly downward, in case any water does manage to get in. Wolo makes it clear that they are not warranted against water damage in the air chamber. A press of the button confirms the reason for doing this work in the first place - these things are LOUD. A couple of points to keep in mind when mounting the trumpets. They should have the covers installed and they should point slightly downward, in case any water does manage to get in. Wolo makes it clear that they are not warranted against water damage in the air chamber. A press of the button confirms the reason for doing this work in the first place - these things are LOUD.
Click here for a wiring diagram.
Click here for a drawing of the mounting bracket.
Last update: 05:11 PM Sunday, September 26, 2004
|
