 |
|
|
|
|
|
Not a member? Join Today to see why so many say they are Proud to be a Venturer!
|
|
| Pudge’s Road King Muffler Modifications and Mounting Bracket |
|
Author: Ken Thompson (Pudge) Views: 29412 Votes: 13 |
|
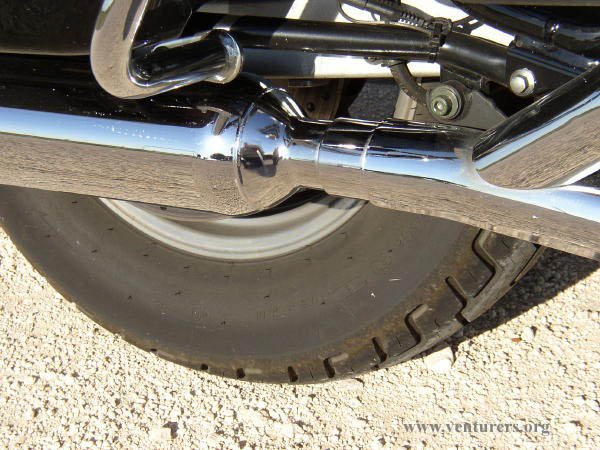
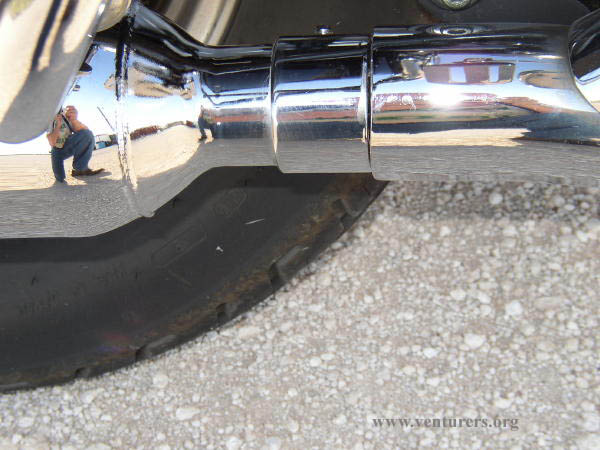
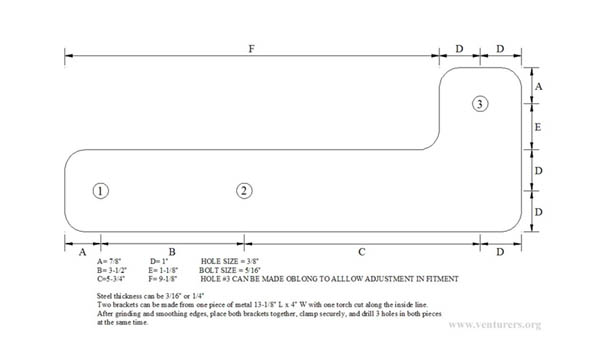
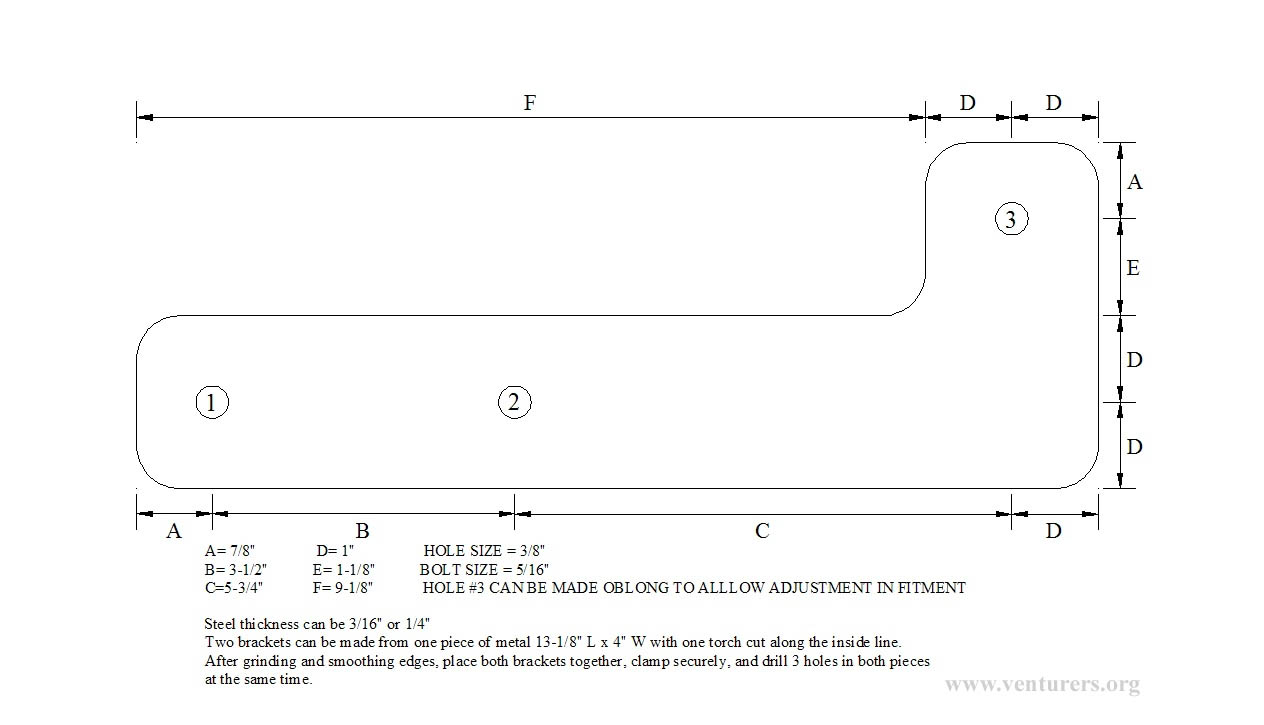
Pudge’s Road King Muffler Modifications and Mounting Bracket Information A very acceptable substitute for the stock RSV mufflers can be made by using take off mufflers from recent models of Harley Davidson Road King motorcycles. These can sometimes be had for next to nothing if you are on good terms with your local Harley Dealer, and if you are patient, you can buy a set on E-Bay for about fifty bucks, including shipping. I personally like the looks of the slash cut RK muffs on the RSV, but the straight cuts also work well and look much like the stock RSV muffs. This information is not original with me, so feel free to use in and pass it along to anyone who might find it of use. You will need a few tools, discussed and named later, a set of RK muffs, and a suitable mounting bracket. Some have successfully used a one-holed “P” clamp sized to fit the saddlebag mounting rail at the rear of the bike. A 5/16” by ¾” long bolt can be used to attach the muff to the bag rail with the clamp by using the rearmost mounting bracket on the RK muff. Some have used a piece of inch wide aluminum channel iron and suitable bolts to attach the muffs, using the front RK muff mount and the stock RSV muffler mounting tab on the bag rails. You can also fashion a mount by using a piece of 2” wide, ¼” thick piece of flat stock about a foot long for a bracket. Lay the stock on the RK muff at an angle so that the two RK muff mounts are covered and the opposite end of the stock covers the hole on the bottom side of the stock RSV muff mounting tab (with the RK muffs in place on the header pipes of your RSV). Measure and mark and drill suitable holes and this bracket will do the job. I use an “L” shaped bracket that I cut with a cutting torch from a piece of 4” wide by ¼” thick flat stock about 11.5 inches long. I have included here a jpg file that contains a drawing of this bracket. It is easily made if you have access to a torch, a grinder, and a drill or drill press. With these dimensions, a fabrication shop could also make these brackets for you. I recommend a set of wide chrome muffler clamps to connect the RK muffs to the header pipes of your RSV. The stock RSV muffs have a heat shield in place that covers this joint. Without that shield in place, there is about a half inch or so of ugly header pipe that is not covered by the RK muff. Some have removed the heat shields from the stock RSV muffs and reattached them to the RK’s. The tech library contains information about how to do that if you wish. I like these wide clamps because they cover the joint nicely and are easy to install. I have included a couple pictures to show these clamps. They can be had by going online to www.ironcitycycles.com/quick.search.php and searching for part number 31-9920. Any motorcycle shop that has a catalog of products made by “V-Twin Manufacturing” should also be able to order these clamps. They retail for less than $30.00 for a pair, and are very good quality clamps. You will need clamps sized to connect 1 7/8” mufflers to 1 ¾” header pipes. The RK muffs can be used in four basic ways: In their stock condition, or in Levels 1, 2, or 3 of modification. I strongly suggest that you install the muffs in their stock condition and ride them for a while. If you proceed with further modification, ride several miles after each mod before you proceed to the next level. The true sound produced will be heard after the motor and mufflers have been ridden long enough to really get things hot. My experience is that the longer you ride, the louder the sound seems. I have tried all four levels of modification, and these mufflers are not really loud at level three. I have also used other after market slip on muffs that are much louder than the RK muffs at any level. You can always go to the next level, but you can’t go back, so make sure before you proceed. You may have to do what I have done. I had to buy another set of stock RK muffs, because that is the sound level that suits me best! So, first mount the stock RK muffs and ride them a while. If you want more sound, here is level 1: Look inside the muffs from the entrance end with a light. You will see a large solid donut shaped solid baffle that holds a perforated tube in the center of the muffler. The large donut baffle has a couple small holes drilled opposite each other about half way between the center tube and the outside skin of the muff. Use a long shanked half inch metal bit and the two small holes as pilots to drill two half inch holes in the large donut baffle. Then carefully drill two more half inch holes opposite the first two, being very careful not to allow the bit to wander (you are drilling at a bit of an angle!) and penetrate the outside skin of the muff. That’s level one -- four half inch holes in the large solid baffle, accessed from the entrance of the muffler. Mount up the muffs and go riding. Still want more sound? Here is level 2: You will need a 1 1/8” diameter bimetal hole saw and a bit extension to allow you to reach the solid baffles in the center perforated tube in the RK muffs. Level two involves drilling out and removing the small solid baffle that can be seen and accessed from the rear of the muffs. This can be done with the muffs on the bike if you choose. You will need an extendable magnet or a piece of wire to fish out the piece of metal if you don’t remove the muffs. I like to do it with the mufflers off and standing upright so most of the drillings fall through to the outside. If they remain inside in the bottom of the muff, they will likely begin to rust and cause problems. When you get this baffle removed, you are done with level two. Mount the muffs and go riding.
TIP: I had trouble getting my bit extension to stay tight on the hole saw bit shank. I finally degreased everything and used JB Weld to make this a permanent connection. You won’t use this very often, but it will now work very well!! Remember that aftermarket slip-ons cost from three to five hundred dollars!! You will spend less than a hundred on this project! You want more noise? Here is level 3: Using the 1 1/8’ bimetal hole saw, remove the small solid baffle from the front of the center perforated tube, accessing it from the entrance of the muffler. You have to remove the muffs for this job. Shake out the cuttings well, mount up the muffs, and go riding. That’s level three. If you want more noise, you might try a set of HD Screaming Eagle Muffs that will fit an RK. They will mount the same as the stock RK muffs. The other alternative is to buy some expensive high dollar muffs. Here is where you get my editorial! Loud pipes DO NOT save lives!!! They only cause non-riding persons (and many persons who ride) to form strong negative opinions of all who ride motorcycles. I have had loud pipes myself. I am guilty!! And I have been the full circle with my RSV. I have spent lots of bucks to get where I am today. Today, I ride a Midnight RSV with a set of stock RK muffs installed. I can hear my engine, it sounds good at idle and under acceleration, I can hear my music and my CB radio, and I can hear my wife. And best of all, I can still hear when I get home at night after an all day ride, instead of suffering with ringing and roaring in my ears all night long. I have not been smart about my hearing, and I have already lost a good bit of it. I am going to try to preserve what I have left. I encourage you to do the same. The level 3 modification discussed here is not loud enough to be offensive to those who may hear your scooter crank and drive away. Of course, if you leave as if you were on a drag strip, they will notice regardless of the kind of muffs you have installed! But I get along nicely with the stock RKs. They look good, they sound good, and they don’t cost an arm and a leg. Best of all, they do not offend!! If you have questions about this information, I will be happy to discuss it with you. You may contact me through my profile address listed on the Venturers Forum. Ride safe, and good riding to all of you!! So long…. Pudge
Download The Full Size Bracket Template Below: http://www.venturers.org/Tech_Library/attachments/full_bracket.jpg
Last update: 07:39 AM Saturday, January 22, 2005 |
| All material on webpages under the domain venturers.org, is the property of The Venturers, Inc. These materials are protected by copyright and other intellectual property laws. You may not reproduce or retransmit the materials, in whole or in part, in any manner, without the prior written consent of The Venturers, Inc. The free information contained herein is offered in the spirit of helping others and any action or advice taken from these pages is the sole responsibility of the receiver. |
