|
Gentlemen: I have been known for pullin the rabbit out of the hat, and once again, I have done it.  My parts arrived last Friday, but due to a couple other jobs I had to do, I wasn't able to get to my scooter until this morning. Well, the new slave is in place, the bike is up and runnin, and I "did not", repeat, "DID NOT" have to remove the exhaust and or the front cover. Not bad for a smuck, huh?? My parts arrived last Friday, but due to a couple other jobs I had to do, I wasn't able to get to my scooter until this morning. Well, the new slave is in place, the bike is up and runnin, and I "did not", repeat, "DID NOT" have to remove the exhaust and or the front cover. Not bad for a smuck, huh??   Total working time was about four hours and that's taking my time and cleaning the parts, the area around the slave, the garge floor and the tools. Naturally, if I had to do it again, it would be quicker. Total working time was about four hours and that's taking my time and cleaning the parts, the area around the slave, the garge floor and the tools. Naturally, if I had to do it again, it would be quicker. 
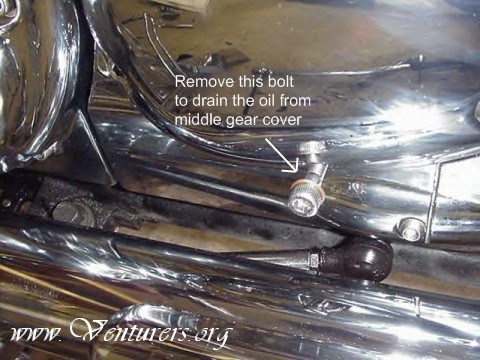
I put the bike up on my lift so I wouldn't have to bend over or down as much. [gettin  ya know. LOL] ya know. LOL]  Then I pulled that back cover. When ya do this, pay attention to the order the bolts come out so they go back in the same holes. The copper washer is at the 6 o'clock position. Torque on those bolts is 7.2 ft. lbs. per the manual, but I torqued em at 8 ft. lbs.cause my torque wrench doesn't go that low. You will lose about a half quart of oil when you remove the bolt with the copper washer, the one at the 6 o'clock position. That will drain the middle gear case. Then remove the other bolts and break the cover free. Have a drain pan in place under it so ya don't make a mess. {AND DON'T FORGET TO TOP THE OIL OFF after the job is done] I had to use a soft hammer with a rag over the end of it so as not to marr the finish on the cover, to break that cover free after the bolts were removed. When cleaning the cover's sealing surface, use a single edge razor to scrape the old gasket off and a piece of steel wool to get any tiny pieces that the razor missed. Do the same on the block being careful not to get any crap on or in it or the big bearing. DO NOT use a gasket scraper as it will gouge the metal and or aluminum. NOTE: In the bottom of that cover is a bushing which the end of the shift shaft is supported by. Clean and apply a little grease in the hole where the bushing is BEFORE ya put it back on. Then I pulled that back cover. When ya do this, pay attention to the order the bolts come out so they go back in the same holes. The copper washer is at the 6 o'clock position. Torque on those bolts is 7.2 ft. lbs. per the manual, but I torqued em at 8 ft. lbs.cause my torque wrench doesn't go that low. You will lose about a half quart of oil when you remove the bolt with the copper washer, the one at the 6 o'clock position. That will drain the middle gear case. Then remove the other bolts and break the cover free. Have a drain pan in place under it so ya don't make a mess. {AND DON'T FORGET TO TOP THE OIL OFF after the job is done] I had to use a soft hammer with a rag over the end of it so as not to marr the finish on the cover, to break that cover free after the bolts were removed. When cleaning the cover's sealing surface, use a single edge razor to scrape the old gasket off and a piece of steel wool to get any tiny pieces that the razor missed. Do the same on the block being careful not to get any crap on or in it or the big bearing. DO NOT use a gasket scraper as it will gouge the metal and or aluminum. NOTE: In the bottom of that cover is a bushing which the end of the shift shaft is supported by. Clean and apply a little grease in the hole where the bushing is BEFORE ya put it back on.
There's also a smaller cover that bolts onto that back cover. When ya pull all the bolts, it'll just fall to the ground. So ya might wanna put a rag there to catch it so as not to scratch it.
Next, I opened up the little clip that holds the wires in place, gently removing the wires one at a time so they'd be out of the way, and bent that clip over just enough to clear the slave.
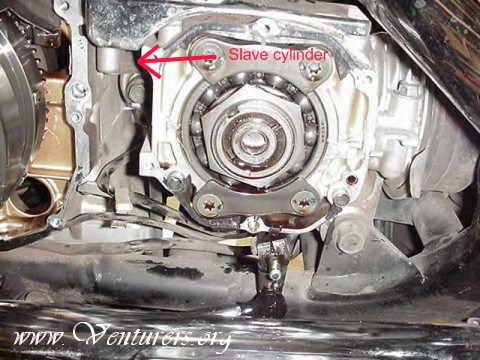
*Note: Pictures show front engine cover removed, this is not necessary to replace slave cylinder. Pics were "borrowed" from another tech article.
Next, I removed the banjo bolt wth the two copper washers, that holds the hydraulic line to the slave, and let it hang down. [Cover the end so no crap gets in it and wipe it good before ya reconnect it to the slave.] There are two support clamps on that line, then the line turns into a flex line so it'll move pretty easy once the support clamps are free. One is just below the slave on the block and one is in front of the motor. Follow the line and you'll see which two I'm talking about. Again, pay attention as to how they come apart so ya put em back the same way.The steel line with the banjo end on it should drop down enough to clear the slave. If you used a lift, like I did, you'll have to fight with it alittle bit to move it from the front of the slave and behind the slave as you're pulling it forward so it will clear and come out, and then visa versa. Otherwise, that line should drop down enough to clear the slave altogether.
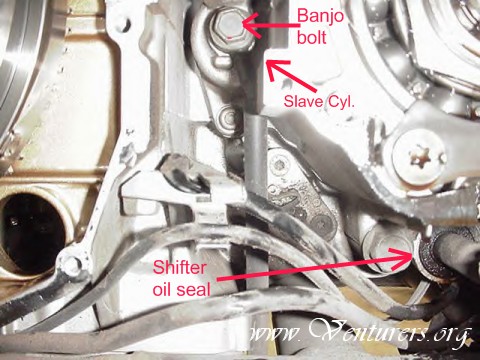
FOOT NOTE: There's alittle oil seal on the shifter shaft where she fits into the bottom of the block. Ya might wanna pick one up just in case it's leaking. Mine was leaking a little bit. Had I known about it, I would have bought and replaced it while I was in there. Otherwise, ya gotta pull that cover again which is really no big deal, just a PIA. LOL!!
Next I turned and twisted the slave so it would clear the wires to get it out. The bleeder was facing up alittle bit and towards me when she finally came out. Then I just reversed that procedure to slip the new one back in.
Once I caught the bolts that held the slave in place, I had to wiggle it alittle so the push rod would seat in the bore of the slave. Then I tightened the bolts EVENLY and a little at a time so the slave went in straight and not crooked. Don't overtighten those bolts. USE NEVERSEIZE on EVERY BOLT you touch on the job. The next guy that takes it apart just might be YOU. 
I used Brakleen in a spray can to clean the area before and again after the slave was out of the way. Now you can see in there much better. Plus I also used it to clean the inside of that cover.
After getting everything back together, bleed the clutch and fill the reservoir to the correct level. Top off the engine oil to the correct level, to replace what was lost when the middle gear cover was removed. Check your work for any leaks. If all is well, you're ready to ride.
Last update: 10:58 PM Monday, May 4, 2009
|
