|
The following article is my documentation of the conversion from a stock ’90 Yamaha Venture Royale into what I will refer to as a Venture SuperSport (SS) using stock Vmax components and a bit of tuning. I hope that this document encourages others with similar interests to consider modifications of their own.
I have modified my '90 Venture into a SS w/ true servo motor controlled VBoost, modified VMax airbox & intakes, Mark's exhaust collector, VMax 4 brush starter, Solid motor mounts, R1 front calipers, Stainless Steel brake & clutch, Progressive fork springs, Superbrace fork brace, etc...
Runs very strong although tuning was a bit of a challenge, but part of the fun & I hope to have it Dyno'd some day.
I owe much of my thanks and appreciation for the information learned through contacts w/ Rey Kirkman, Bill Miller, Curt Dennin, Steve Detamore, & Rick Butler.
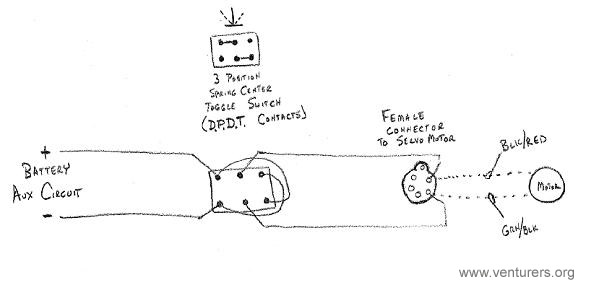
I am not using the VBoost controller box, as I did not have one at the time I modified my bike.
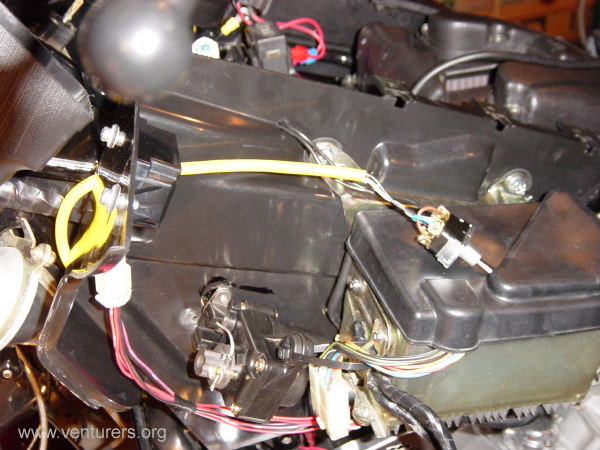
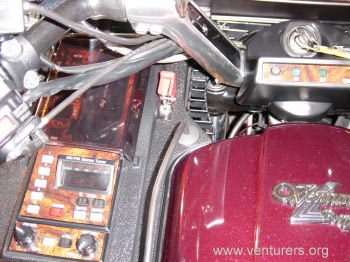
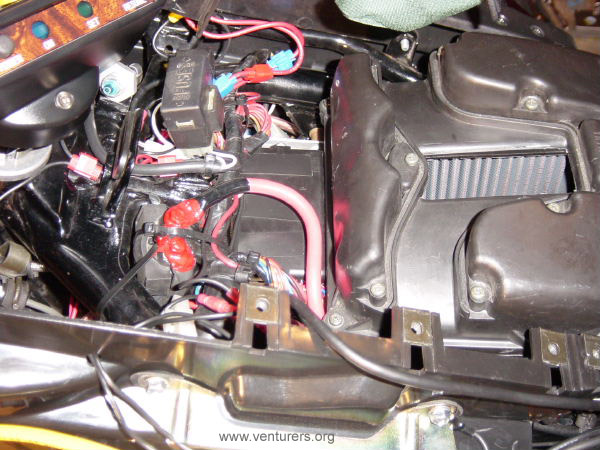
I am controlling my Vboost servomotor with a three-position toggle switch spring center in the off position. The Vboost servomotor fits in the space under the LH tuner radio section. I cut holes thru the divider panel to run the cable and wiring as seen in the following picture.
I don't know exactly how the factory Vboost control box handles the servo as I have never had one...
My guess is it has an op amp window comparator circuit that opens vboost based on the computer rpm tach feedback.
The "servo" Vboost motor is a simple dc motor with an integral geared linear potentiometer for feedback.
Voltage is applied to the motor until the potentiometer reaches a setpoint that interrupts the circuit in both the opened & closed conditions.
The problem is that the servomotor cannot handle being left on in a stalled condition in either position. The toggle switch is mounted on the left hand side of dash panel between the radio and the tank cover.
I learned this the hard way by burning up the armature coil wires of my first motor. They are made of the lightest gauge micro wire and apparently cannot handle the full current draw of a motor stall condition for very long.
Keep in mind that it is close to impossible to accurately synch these V4 carb banks with the Vboost open so I would recommend having a way of opening or closing the butterfly as needed. A manual cable operated VBoost is another consideration.
As I stated I leave VBoost on most of the time including thru cruising rpm ranges.
VBoost definitely causes a surge in power when the butterfly's open up that I personally didn't want to come on automatically at a given rpm, especially in the cruising range.
My simplistic circuit is as follows, but I have been working on a possible circuit described above w/out the Vboost control unit.
My cold air comes up under the fake tank cover from the front of the bike. With my battery layed down on its side it creates a clear pocket for air to filter straight into the Vmax air box.
It is most likely not as cold as the air above the tank cover. Rey Kirkman has 1" holes in both sides of the tank cover to draw the coldest air.
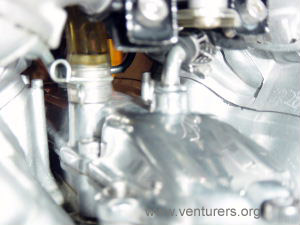
I avoided a problem with the water hose that gets bent coming out of the crankcase breather cover hitting the Vboost crossovers tubes by replacing the stock cover with a Vmax crankcase cover. I then buff polished the black painted aluminum cover to make it look better by matching other engine components.
The biggest decision you must make is to either use the VMax airbox where you will need to relocate the battery, or go with a modified Venture airbox with the stock battery setup.
The stock VMax box delivers much more volume of air to the carbs, and I was after peak HP performance so this is the path that I took.
I removed the center “Y” section of the Vmax airbox to allow more airflow.
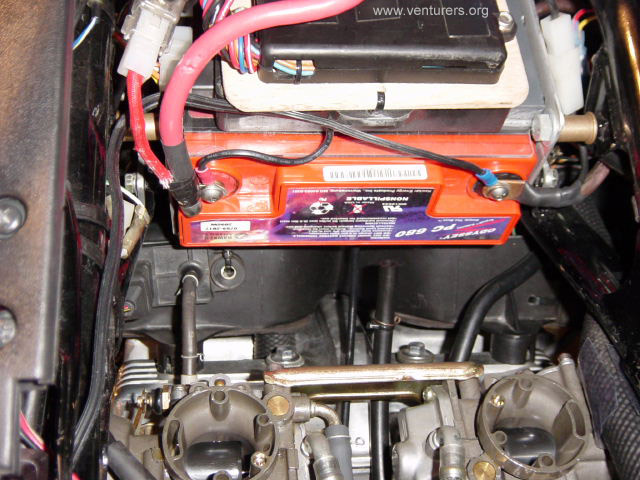
I am using the VMax airbox & spent a considerable amount of time creating a custom battery box using an Odyssey gel cell battery layed on it side mounted in the underutilized space above the front two cylinders.
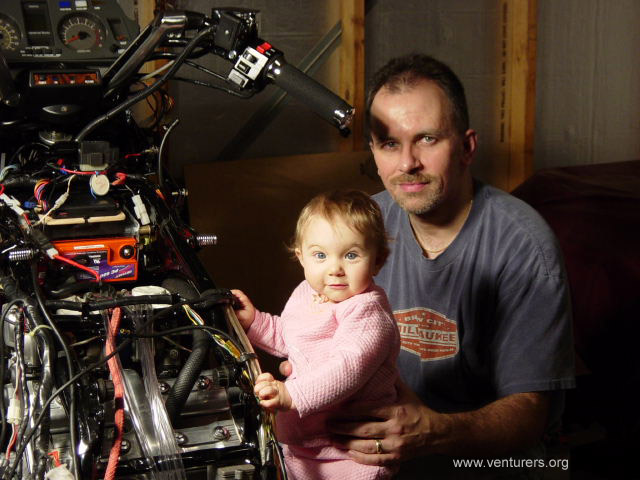
sometimes get more help than I really need from my baby daughter Katrina, but I love the attention from my little mechanic.
The spark plug donut coils were taken off their mounting brackets along with the TCI box, and vacuum advance control unit. The vacuum advance unit is now mounted to the front cylinders upper plastic deflector plate as shown in the following picture. The TCI box is sitting on top of the battery in a custom made holder.
I then broke up my spark plug coils and mounted them above and almost on top of each cylinder on the plastic deflector plates that go over the cylinder head covers.
I have maximized the efficiency of the spark plug coils by relocating each of them w/ in 6 inches of the spark plugs.
I now have a very strong spark, and the added benefit of reduced radio noise interference.
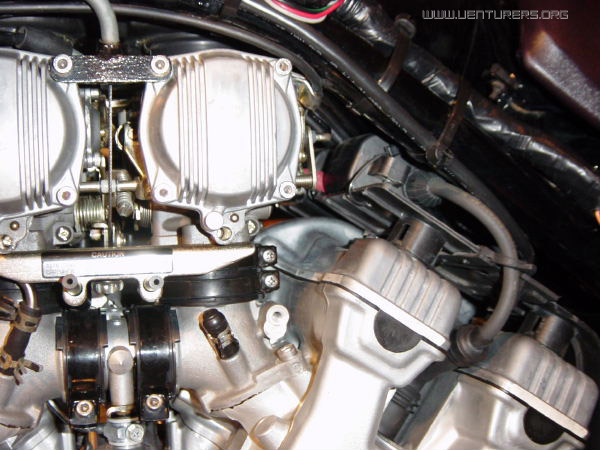
I started with a Vmax Dynojet Stage 1 kit & ordered a few additional jets like the DJ146’s that I am currently using for my main jets. The stock mains are Mikuni 125’s.
I have changed the pilot jets from the stock Mikuni 37.5’s to Mikuni 42.5’s.
There is a big difference between Mikuni & Dynojet jet sizes just for your information. I did find a comparison chart if you are interested. Mikuni jets are better I am told.
I am not using the Dynojet springs anymore as I found them to be too weak, but I am using the stock Venture springs that I replaced new so they would be good and strong.
I did not drill the lift hole on the slide as indicated in the kit.
My current tuned setup is as follows:
VBoost w/ a modified Vmax airbox.
Marks open exhaust collector.
DJ146's main jets (Mikuni 135’s could be used as substitutes).
PAJ#2's at MK170 (stock as far as I can tell - My service manual must be wrong listing MK180).
Pilot jets changed to MK42.5's
I have the e-clip on the top notch of the Dynojet needle w/ no washers, and my fuel/ air mixture screws out 2.5 turns from seated.
The last mod was I changed out my Pilot Air Jet number 1 from a MK#80 to a MK#90 and it seems to have made a big difference at the low end throttle response (off idle up to 2000rpm's).
The bike is running stronger than ever so I now plan on having it checked with an exhaust gas analyzer before doing any more tuning.
I know that I should not put much stock in seat of the pants feedback, but I can't seem to feel any flat spots thru the entire torque spectrum.
It just pulls extremely hard & fly’s thru the rpm’s all the way to redline.
I am able to leave Vboost open at all times, but I shut it down when I get in heavy congested traffic & when I start the bike cold.
I chose at this time not to use the Vmax heads & cams, as I am not yet convinced that this setup provides significantly more HP.
It does however move the torque spectrum up by approximately 2K rpm's & I was not ready to spin the motor that much faster at this date though it does seem to be able to handle it as experienced by others.
Regards,
Dave Getsfried (VTS #11468/ Venturers #172/ VMOA #1377)
5779 Hwy 144
West Bend, WI 53095
davegets@hotmail.com
Last update: 03:30 PM Saturday, January 29, 2005
|
